Architecture Design Studio V
The teaching objectives of this module are:
1. To introduce aspects of the city and urbanity in relation to architectural design
2. To develop an awareness and application of legislative requirements and socio-behavioural patterns of urban environments and communities in architectural design
3. To explore key stages involved in architectural design development
 Preliminary Studies : Site Analysis |  Final Project : Urban Infill - Community Library |
|---|
Architecture Design Studio V
The teaching objectives of this module are:
1. To introduce aspects of the city and urbanity in relation to architectural design
2. To develop an awareness and application of legislative requirements and socio-behavioural patterns of urban environments and communities in architectural design
3. To explore key stages involved in architectural design development
Preliminary Studies : Site Analysis | Final Project : Urban Infill - Community Library |
|---|
PROJECT 2
PROJECT 1
Computer Application
Computer Application, a unique module that we learn most of the architecture computer application to advance the drawings such as orthographic drawings, 3D modelling, massing, axonometric drawings, etc.
The teaching objectives of this module are to:
-To produce architectural drawings documentation of the selected architectural design.
-To understand and execute the appropriate rendering settings.
-To enhance the visual outcome of the renderings using post-production tools
Revit Modeling & Documentation
Objective:
This project involves the production of Revit model of the selected architecture design using Architectural Components such as Wall, Roof, Stairs, Floor, Curtain Wall, Doors and Windows. At the end of the project, the model shall be used to generate documentation drawings, using Revit Architecture’s Documentation Components such as Sheets, Titleblock, Sections, Room Tags, Schedule & etc.
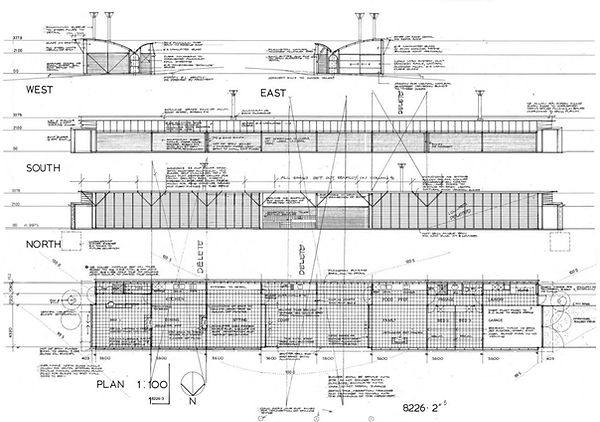
This is an individual project. We require to produce a Revit model of the selected architectural design. My selected architectural design is the building located at Bingie Point, Australia, named Magney House, and this is designed by architect Glenn Murcutt. It is a simple building with single story. The massing is just like putting 6 cubes together to form the building. From this building, I require to produce a Revit 3D model of Magney House and at least 2 Revit families. Not only that, I also require to produce few orthographic drawings such as floor plan, section view, elevation, and even axonometric drawing.
Work in progress(WIP) is also required to submit as an evidence of my own work, and so the WIP is uploaded onto this platform as requested.
Submission:
1. 3D digital model in Revit file and at least 2 Revit family files
2. Lists of drawings:
- Plan
- Elevations
- 2 Sections
- 2 Callouts on sections
- 1 Exploded isometric
- 1 Room Schedule showing area tabulation
3. Work in progress(WIP)
Reference: https://www.area-arch.it/en/magney-house/
First I referred to a detail drawing with most of the dimensions

Next, I drew grid lines with dimension in my Revit2017


The grid lines guides me to finish the wall of the building first.

Then, adjusting the floor level in elevation view.


Next, I changed the wall to the proper height by using [Top Constraint].


Creating the floor according to the outline of the outer wall.


After the walls and floor were finished, the doors were then added.


The front walls were changed to curtain walls.

Added curtain grids and mullions to the walls.


Adding more small rooms in the main rooms.

Next, the windows were added to the wall facing to the south.

Then, I changed the height of the inner walls at the southern part of the building higher.This was to estimate
the roof height I needed to create later.


The roof was created through [Create Extrusion Roof], drawing the roof shape and formed along the whole building.


Then, the walls were cut below the roof.

The same method was applied on the northern part of the building, adding curtain walls below the roof.

Roof trusses were added


The Revit family file was added too after creating a new family.

Creating a new family in Revit.


Finally this is how the building model looks like.
Submission Files: https://drive.google.com/open?id=0BzN5A5RIAYzMY0VfeTdJczJLdEE
Exterior & Interior Renderings
Submission:
1. 3D digital model in 3DS Max file and 2 views in jpeg format (exterior and interior view)
2. Texture of material files that were used in model rendering
3. Work in progress(WIP)
Objective:
The project involves the production of photorealistic still renderings using 3DS Max of the selected architecture design with materials, appropriate camera views and post-production enhancement on the visual outcome. The visualisation work would be assessed on the types and ways materials are used, types of lights and effects used to set up the scene, setup of appropriate camera views for rendering and skills of using postproduction tools to enhance the visual outcome.
We are requested to render our first project model in 3DS Max for exterior view and interior view as submission requirements.
Work in progress(WIP) is also required to submit as an evidence of my own work, and so the WIP is uploaded onto this platform as requested.

Imported previous project model (first project Revit model) into 3DS Max.

Select specific part and change its material.


Place the camera and adjusting its position.

Add ground and its texture to the model.
Do the test render first, then I started the final render.
After rendering, I used Photoshop to further enhance the quality of the image.


Final production: Exterior View
Interior View
Submission Files: https://drive.google.com/open?id=0BzN5A5RIAYzMZG5XZlJLZ1BoX1E
